What is DNSSEC?
DNSSEC (Domain Name System Security Extensions) is a suite of extensions that add an additional layer of security to the traditional DNS (Domain Name System) by enabling cryptographic validation of DNS responses. The main purpose of DNSSEC is to protect DNS from certain types of attacks, such as cache poisoning and man-in-the-middle attacks, by ensuring that DNS responses are authentic and have not been altered during transmission.
DNSSEC does this by allowing DNS responses to be digitally signed. When a DNS client (like a browser or a DNS resolver) requests information from a DNS server that supports DNSSEC, it can verify the signatures to ensure that the data it receives is correct and came from the intended source.
How DNSSEC Works
To understand how DNSSEC works, let us break down the key concepts:
Digital Signatures and Public/Private Keys:
DNSSEC uses public-key cryptography to sign DNS data.
When DNSSEC is enabled for a domain, the zone’s DNS records are signed with a private key, and the corresponding public key is published in the DNS. This allows clients to validate the authenticity of the records.
Chain of Trust:
DNSSEC relies on a hierarchical chain of trust, which begins at the root DNS zone (the highest level of the DNS hierarchy).
Each DNS zone in the chain (e.g., example.com) is signed by its parent zone (e.g., .com), and this continues all the way up to the root zone.
By validating each step in the chain, clients can ensure that the DNS data has not been tampered with.
DNSSEC Records: DNSSEC introduces several new DNS record types:
RRSIG (Resource Record Signature): Contains the cryptographic signature for a DNS record.
DNSKEY (DNS Key Record): Contains the public key used to verify the signatures.
DS (Delegation Signer Record): Links a child zone to its parent zone in the DNSSEC chain of trust.
NSEC and NSEC3 (Next Secure Record): Used to prove the non-existence of a DNS record in a signed zone.
Benefits of DNSSEC
Prevents DNS Spoofing and Cache Poisoning: DNSSEC ensures that the response to a DNS query has not been tampered with. Without DNSSEC, attackers can inject false information into DNS resolvers, redirecting users to malicious websites.
Enhances Overall Security of DNS Infrastructure: DNSSEC helps improve trust in the DNS by ensuring the integrity of DNS responses. This is particularly important for critical services like e-commerce, online banking, and government websites.
Supports Other Security Features: Some advanced security mechanisms (like DANE, which secures TLS certificates) rely on DNSSEC to function.
However, while DNSSEC enhances security, it doesn’t provide confidentiality (i.e., DNS queries and responses can still be viewed by third parties). To add confidentiality, technologies like DNS over HTTPS (DoH) or DNS over TLS (DoT) should be used in combination with DNSSEC.
How to Enable DNSSEC for All Domains on a Server
Enabling DNSSEC for all domains hosted on a server involves several steps. The process will vary depending on the DNS server software and the hosting environment you use. Below, we will cover the general steps for enabling DNSSEC using two popular DNS server setups: BIND and PowerDNS. We will also cover DNSSEC configuration for domain registrars and control panels such as cPanel/WHM.
General Steps for Enabling DNSSEC:
Generate DNSSEC Keys:
DNSSEC requires a set of cryptographic keys (public and private keys) for signing the DNS records. This process typically involves generating Zone Signing Keys (ZSK) and Key Signing Keys (KSK).
Sign the DNS Zone:
After generating the keys, the DNS zone files (which contain the DNS records) need to be digitally signed using the private keys.
Publish the DNSKEY and DS Records: The DNSKEY (public key) record must be added to the DNS zone.You will also need to provide your domain registrar with a DS (Delegation Signer) record, which links your domain’s DNSKEY with its parent zone in the chain of trust.
Configure DNSSEC Validation on DNS Resolvers:
For clients and DNS resolvers to benefit from DNSSEC, they need to be configured to perform DNSSEC validation. Most modern DNS resolvers like Unbound and BIND can be set up to validate DNSSEC responses automatically.
Test the DNSSEC Setup:
After setting up DNSSEC, it’s important to test that DNS records are properly signed and can be validated by external resolvers.
A. Enabling DNSSEC on BIND DNS Server
BIND (Berkeley Internet Name Domain) is one of the most widely used DNS servers, and it fully supports DNSSEC.
Steps to Enable DNSSEC for Domains on BIND:
Generate DNSSEC Keys: BIND includes a tool called dnssec-keygen to generate DNSSEC keys. You’ll need to generate two keys: one for signing the zone (ZSK) and one for signing the key (KSK):

This will generate two files for each key (public and private).
2. Add the Keys to Your Zone File: Add the public key to your zone file (example.com.zone):

3. Sign the DNS Zone: Use dnssec-signzone to sign the zone file:

This command will create a new signed zone file, typically named example.com.zone.signed.
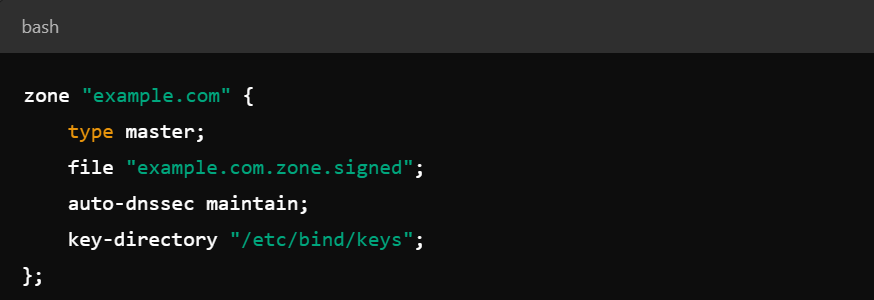
4. Update BIND Configuration: Modify your BIND configuration (named.conf) to point to the signed zone file:

5. Publish the DS Record: After signing the zone, a DS record will be generated. Provide this record to your domain registrar to complete the chain of trust.
6. Reload BIND: After configuring everything, reload BIND to apply the changes:

7. Test DNSSEC: Use dig or online tools (like DNSViz) to test your DNSSEC configuration:

B. Enabling DNSSEC on PowerDNS
PowerDNS is another popular DNS server that offers DNSSEC support.
Steps to Enable DNSSEC for Domains on PowerDNS:
Enable DNSSEC in PowerDNS Configuration: In your pdns.conf file, enable DNSSEC:

2. Set up DNSSEC for a Domain: Use the pdnsutil command to enable DNSSEC for a specific domain.

3. Generate DS Record: After securing the zone, generate the DS record for your domain:

4. Provide DS Record to Registrar: Copy the DS record and submit it to your domain registrar.
5. Test DNSSEC: As with BIND, use dig or an online tool like DNSViz to verify that DNSSEC is working properly.
C. Enabling DNSSEC in cPanel/WHM
If you’re using cPanel/WHM to manage your domains, enabling DNSSEC is relatively simple as it has a built-in interface for DNSSEC management.
Steps to Enable DNSSEC for Domains in cPanel/WHM:
Log into WHM: Go to the WHM interface of your server
Navigate to DNS Functions: Go to Home → DNS Functions → Enable DNSSEC for Domains.
Select the Domain: Choose the domain you want to enable DNSSEC for and click Create Keys.
Generate DS Record: After creating the keys, a DS record will be provided. Copy this and submit it to your registrar.
Verify the DNSSEC Setup: After completing the process, use a tool like DNSSEC Analyzer or dig to check the DNSSEC status.
DNSSEC is a powerful security enhancement for the DNS system, preventing certain types of attacks by ensuring that DNS responses are legitimate and untampered. While enabling DNSSEC requires generating cryptographic keys, signing DNS zones, and updating DNS records at the registrar level, the process is straightforward when using DNS server software like BIND or PowerDNS, or control panels like cPanel/WHM.
By enabling DNSSEC for all domains on a server, you significantly increase the trust and integrity of your DNS infrastructure, ensuring that users can access your services safely without fear of DNS-based attacks.
