Cloning a WordPress website involves creating an exact copy of the site, including its files, database, themes, plugins, and configurations. This process is useful for various purposes, such as creating a staging environment, moving the site to a new host, or simply backing up the site. This guide provides an in-depth walkthrough on how to clone a WordPress website using different methods, including plugins, manual processes, and cPanel tools.
Why Clone a WordPress Website?
Staging and Development: Test new features, themes, or plugins on a cloned site before applying changes to the live site.
Migration: Move your site to a new server or domain without downtime or data loss.
Backup: Create a full backup of your site to restore it in case of issues or failures.
4. Redesign: Work on a new design or theme without affecting the live site.
Methods to Clone a WordPress Website
1. Cloning with a WordPress Plugin
Using a plugin is the easiest and most common method to clone a WordPress site. There are several plugins available, but one of the most popular is Duplicator.
Step 1: Install and Activate the Duplicator Plugin
1. Log in to your WordPress dashboard.
2. Navigate to Plugins > Add New.
3. Search for “Duplicator” and click Install Now.
4. Once installed, click Activate.
Step 2: Create a Site Package
1. After activation, go to Duplicator > Packages.
2. Click the Create New button.
3. Follow the on-screen instructions. You can choose to include all files and the database or customize the package to exclude certain items.
4. Click Next to start the scanning process. This will check for any issues before creating the package.
5. Once the scan is complete, click Build to create the package.
Step 3: Download the Package
1. Once the package is built, you’ll be prompted to download two files: the Installer (installer.php) and the Archive (a .zip file).
2. Download both files to your local computer.
Step 4: Upload the Package to the New Location
1. Use an FTP client (like FileZilla) or cPanel’s File Manager to upload the installer.php file and the Archive to the root directory of your new location (e.g., your new domain or server).
Step 5: Run the Installer
1. In your web browser, navigate to the installer.php file (e.g., `http://newdomain.com/installer.php`).
2. Follow the on-screen instructions to complete the installation. This process will extract the archive and set up the cloned site on the new location.
3. During the setup, you’ll be prompted to enter the database details for the new location.
Step 6: Update the Permalinks and Settings
1. Once the installation is complete, log in to the WordPress dashboard of the cloned site.
2. Go to Settings > Permalinks and click Save Changes to refresh the permalinks.
3. Review the site and make any necessary adjustments, such as updating the site URL in Settings > General.
2. Cloning a WordPress Site Manually
If you prefer not to use a plugin, you can manually clone a WordPress site. This method requires more technical knowledge but gives you greater control over the process.
Step 1: Backup the Original Site
1. Download the Files:
– Use an FTP client or cPanel’s File Manager to download all files from the root directory of your WordPress installation.
2. Export the Database:
– Log in to cPanel and go to phpMyAdmin.
– Select the database used by your WordPress site.
– Click on the Export tab and choose the Quick method and SQL format.
– Click Go to download the database.
Step 2: Upload the Files to the New Location
1. Upload the Files:
– Use an FTP client or cPanel’s File Manager to upload the files you downloaded in Step 1 to the root directory of the new location (e.g., your new domain or server).
2. Import the Database:
– Log in to cPanel and go to phpMyAdmin.
– Create a new database for the cloned site.
– Select the new database and click on the Import tab.
– Choose the SQL file you exported in Step 1 and click Go to import the database.
Step 3: Update the Database for the New Location
1. Update the Site URL:
– After importing the database, you need to update the site URL to reflect the new location.
– In phpMyAdmin, locate the `wp_options` table in the new database.
– Find the `siteurl` and `home` rows and update them with the new URL.
2. Update the wp-config.php File:
– In the root directory of your new location, edit the `wp-config.php` file.
– Update the database name, username, and password to match the new database details.
Step 4: Test and Finalize
1. Log in to the New Site:
– Go to the login page of the cloned site (e.g., `http://newdomain.com/wp-admin`) and log in with your existing credentials.
2. Update Permalinks:
– Go to Settings > Permalinks and click Save Changes to refresh the permalinks.
3. Review the Site:
– Check that all pages, posts, and media files are working correctly. Update any hardcoded URLs if necessary.
3. Cloning via cPanel (Site Publisher and Backup Wizard)
cPanel offers built-in tools like Site Publisher and Backup Wizard that can be used to clone a WordPress site.
Step 1: Backup the Original Site
1. Backup the Files:
– In cPanel, go to File Manager and compress the entire WordPress installation directory into a .zip file.
– Download the .zip file to your local computer.
2. Backup the Database:
– In cPanel, go to Backup Wizard and create a backup of your database. Download the backup file.
Step 2: Upload the Backup to the New Location
1. Upload the Files:
– Use File Manager or an FTP client to upload the .zip file to the root directory of the new location.
– Extract the files.
2. Restore the Database:
– In cPanel, go to phpMyAdmin and create a new database for the cloned site.
– Import the database backup into the new database.
Step 3: Configure the New Site
1. Update wp-config.php:
– Edit the `wp-config.php` file in the new location and update the database details.
2. Update the Site URL:
– In phpMyAdmin, update the `siteurl` and `home` values in the `wp_options` table to reflect the new URL.
Step 4: Finalize and Test
1. Log in and Update Permalinks:
– Log in to the cloned site and update the permalinks.
2. Review the Site:
– Check for broken links, missing media, or other issues, and fix them as needed.
Potential Issues and Troubleshooting
1. Incorrect Database Details:
– Ensure that the database name, username, and password in the `wp-config.php` file match the new database.
2. Permalinks Not Working:
– If permalinks are broken after cloning, reset them in the WordPress dashboard under Settings > Permalinks.
3. Missing Media Files:
– If some media files don’t load correctly, verify that all files were uploaded to the correct directory.
4. Hardcoded URLs:
– Update any hardcoded URLs in your theme files, widgets, or content to reflect the new domain.
5. SSL Issues:
– If your new site uses HTTPS, ensure that the SSL certificate is correctly installed and configured.
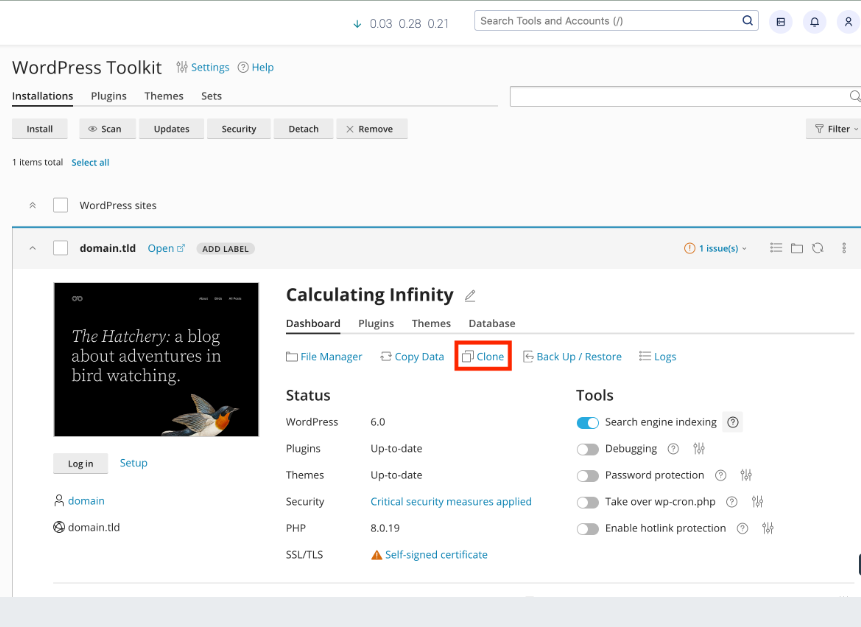
However, you can also clone your website using wp toolkit, which makes cloning wordpress sites easy. First nagivate to the wp toolkit interface in either whm or cpanel under the domain name you would like to clone, click on clone.

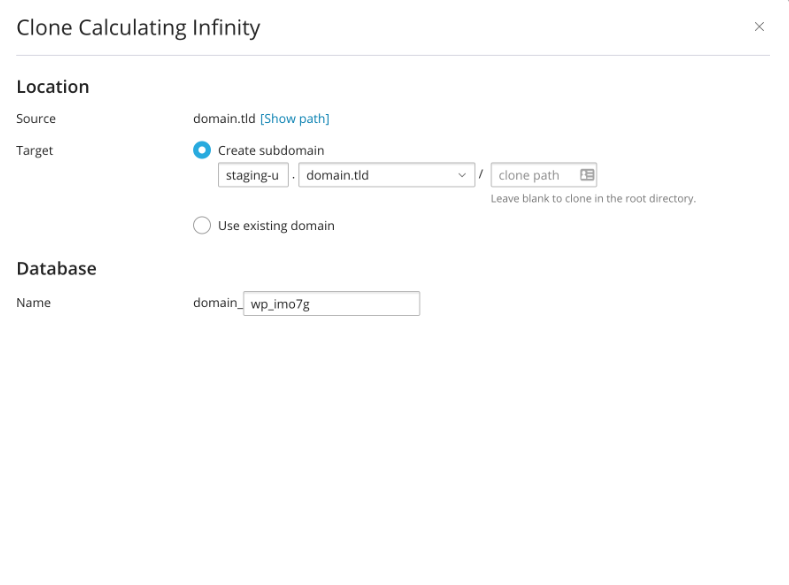
After clicking on clone, a window will pop up asking if you want to clone the wordpress on a new subdomain or existing domain.

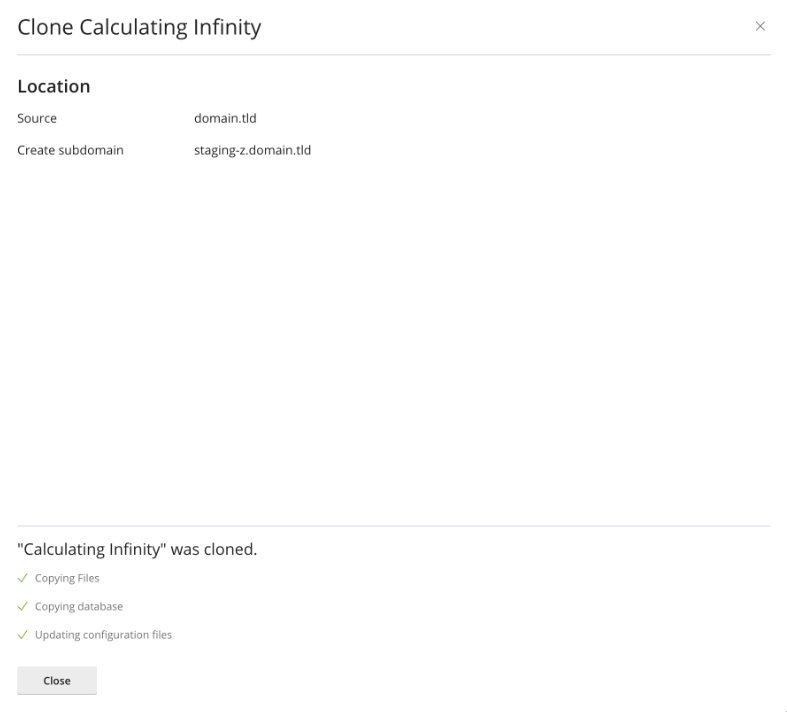
After configuring the subdomain click on start and the cloning process will begin. When the cloning is complete you will receive a notification that your website was cloned.

Cloning a WordPress website can be a straightforward process with the right tools and knowledge. Whether you choose to use a plugin, perform the process manually, or use cPanel’s tools, this guide provides you with the steps needed to successfully clone your site. Always remember to back up your site before proceeding and test the cloned site thoroughly to ensure that everything works as expected.
By mastering the process of cloning a WordPress site, you can manage your website more effectively, create secure testing environments, and ensure that your data is always safe and recoverable.
