Redirecting all pages of one domain to another domain is a common task when changing a website’s domain, moving to a new platform, or consolidating multiple websites. This process is known as domain redirection or 301 redirects and ensures that visitors to your old domain are seamlessly directed to the new domain without losing the specific page they were trying to access.
In this guide, I will explain various methods for redirecting all pages from one domain to another domain, including using .htaccess, Nginx, PHP, and DNS redirection.
Why Set Up Domain Redirection?
1. SEO Benefits: Properly implementing redirects helps preserve the SEO rankings of the old domain. A 301 redirect informs search engines that the content has permanently moved to a new location, transferring the SEO authority.
2. User Experience: Visitors to the old domain are automatically redirected to the same pages on the new domain, ensuring they find the content they were looking for.
3. Avoid Broken Links: Redirecting all pages prevents 404 errors, which can frustrate users and negatively impact search engine rankings.
1. Redirect Using `.htaccess` (Apache Server)
If you are using an Apache web server, the easiest way to redirect all pages of one domain to the same pages on another domain is by modifying the `.htaccess` file. This is particularly useful for websites hosted on cPanel or other hosting platforms using Apache.
Steps:
1. Access the .htaccess File:
– Connect to your server using FTP, SSH, or your hosting control panel.
– Locate the `.htaccess` file in the root directory of your old domain (usually the `public_html` folder).
– If the `.htaccess` file does not exist, create one.
2. Edit the .htaccess File:
– Open the `.htaccess` file with a text editor and add the following code to redirect all pages:

Explanation:
– `RewriteEngine On`: This enables the mod_rewrite module.
– `RewriteCond %{HTTP_HOST} ^old-domain\.com [NC]`: This condition checks if the request is coming from `old-domain.com`. The `[NC]` flag means “No Case”, so it ignores case sensitivity.
– `RewriteRule ^(.*)$ https://new-domain.com/$1 [L,R=301]`: This rule redirects all requests from the old domain to the new domain while preserving the URL structure. The `$1` captures everything after the old domain and appends it to the new domain. The `[L,R=301]` flag means “Last Rule” and that the redirect is permanent (301).
Example:
If a user visits `https://old-domain.com/blog/post`, they will be redirected to `https://new-domain.com/blog/post`.
3. Save the File and Test:
– Save the changes and upload the `.htaccess` file back to the server.
– Test the redirection by visiting various pages on the old domain to ensure they are being redirected properly to the new domain.
2. Redirect Using Nginx
If your website is hosted on an Nginx server, you can set up a domain-wide redirect by modifying the Nginx configuration file.
Steps:
1. Access Nginx Configuration:
– SSH into your server and navigate to the Nginx configuration file.
– This is typically found at `/etc/nginx/nginx.conf` or `/etc/nginx/sites-available/default`.
2. Modify the Configuration:
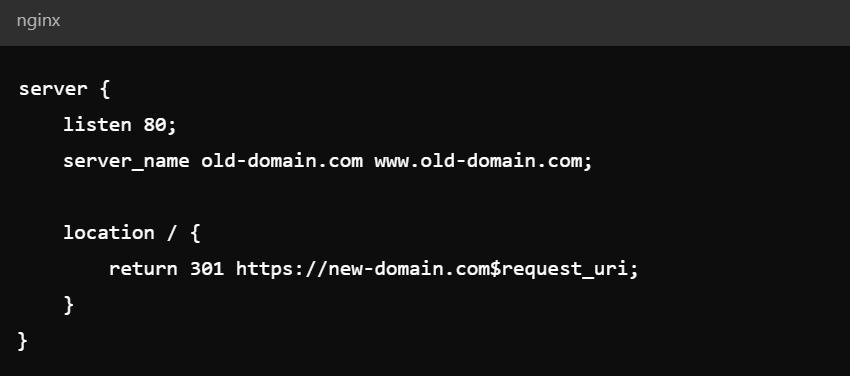
– Add the following server block to the Nginx configuration file:

Explanation:
– `listen 80;`: This specifies that the server is listening for HTTP requests.
– `server_name old-domain.com www.old-domain.com;`: This specifies the domain names for which the server block applies.
– `location /`: This applies the redirection to all paths.
– `return 301 https://new-domain.com$request_uri;`: This redirects all requests to the new domain while maintaining the same path (using `$request_uri`).
3. Restart Nginx:
– After saving the configuration, restart Nginx to apply the changes:

4. Test the Redirection:
– Open your browser and test the redirection by visiting different URLs on the old domain.
3. Redirect Using PHP
In cases where you do not have access to the server configuration files or are using shared hosting without control over `.htaccess` or Nginx, you can use PHP to perform a redirect.
Steps:
1. Create a Redirect Script:
– In the root directory of the old domain, create an `index.php` file (or modify the existing one).
– Add the following code to redirect all pages to the new domain:

Explanation:
– The first `header()` function sends a 301 Moved Permanently status code to the browser and search engines, indicating that the page has permanently moved.
– The second `header()` function redirects the user to the new domain while preserving the original request URI (the part of the URL after the domain).
– `$_SERVER[‘REQUEST_URI’]` ensures that the path (e.g., `/blog/post`) is appended to the new domain.
2. Test the Redirection:
– After saving the `index.php` file, test the redirection by visiting different pages on the old domain.
4. Redirect Using DNS (Only for Entire Domain)
If you want to redirect the entire domain (not specific pages) to a new domain, you can achieve this at the DNS level by setting up a 301 Redirect through your domain registrar or DNS provider. Note that this method is only suitable for redirecting the entire domain and may not preserve specific URLs.
Steps:
1. Access Your Domain Registrar:
– Log in to your domain registrar’s control panel (e.g., SmartWeb Nig. Ltd., Cloudflare).
2. Set Up DNS Redirect:
– Look for an option to set up domain forwarding or URL redirect.
– Set the old domain to forward to the new domain.
– Choose the 301 Redirect option to ensure that the redirect is permanent.
3. Test the Redirection:
– It may take some time for the DNS changes to propagate (typically within 24-48 hours).
– Once the changes have propagated, test the redirection by visiting your old domain.
Redirecting all pages from one domain to another ensures that users and search engines seamlessly transition to the new domain without losing access to specific pages. Whether you are using Apache, Nginx, PHP, or DNS-based redirection, implementing 301 redirects is crucial for maintaining SEO rankings and delivering a good user experience.
The method you choose will depend on your server setup and access to configuration files, but in most cases, `.htaccess` and Nginx configuration offer the most control.
