An email signature is a block of text appended to the end of an email message. It often contains the sender’s name, contact information, and sometimes a sign-off message or a company logo. Creating an email signature in webmail is a straightforward process. This guide provides detailed instructions for setting up an email signature in popular webmail clients such as cPanel Webmail (Roundcube, Horde, and SquirrelMail), Gmail, and Outlook Webmail.
1. Creating an Email Signature in cPanel Webmail
cPanel Webmail offers three different interfaces: Roundcube, Horde, and SquirrelMail. Below are the steps for each:
Roundcube
1. Log in to Roundcube:
– Access your webmail by visiting `yourdomain.com/webmail` and log in with your email address and password.
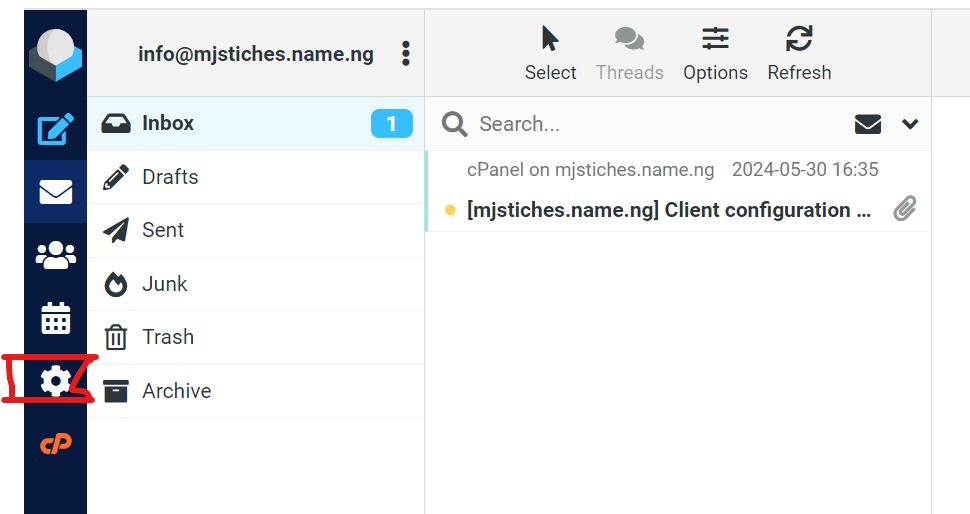
2. Navigate to Settings:
– Click on the “Settings” icon (usually a gear icon) in the bottom right corner.

3. Create a Signature:
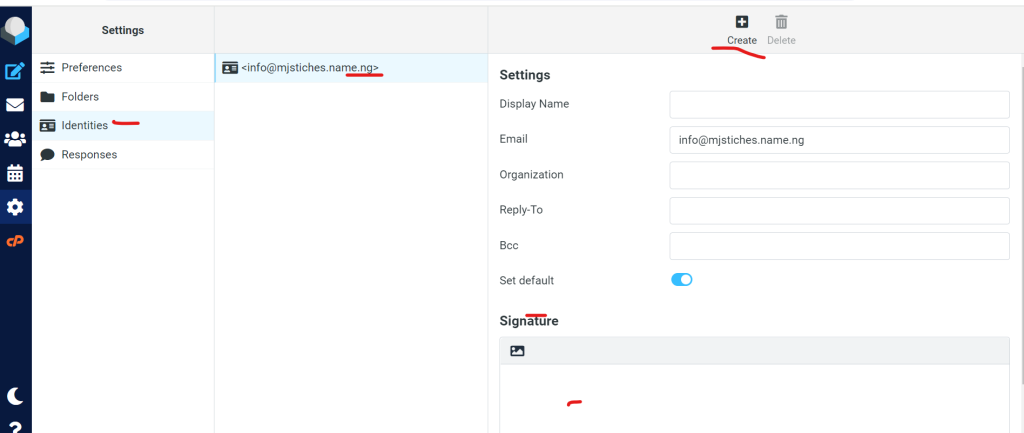
– Click on “Identities”.
– Select your email address.
– In the “Signature” section, enter your desired signature.
– You can use the formatting options to add bold text, links, and images.
– Click “Save”.

Horde
1. Log in to Horde:
– Access your webmail by visiting `yourdomain.com/webmail` and log in with your email address and password.
2. Navigate to Preferences:
– Click on “Preferences” in the top menu.
3. Create a Signature:
– Under the “Mail” section, click on “Personal Information”.
– In the “Your Signature” field, enter your desired signature
– Use the formatting options to customize your signature.
– Click “Save”.
SquirrelMail
1. Log in to SquirrelMail:
– Access your webmail by visiting `yourdomain.com/webmail` and log in with your email address and password.
2. Navigate to Options:
– Click on “Options” in the top menu.
3. Create a Signature:
– Click on “Personal Information”.
– In the “Signature” field, enter your desired signature.
2. Creating an Email Signature in Gmail
1. Log in to Gmail:
– Go to [Gmail](https://mail.google.com/) and log in with your Google account.
2. Navigate to Settings:
– Click on the gear icon in the top right corner and select “See all settings”
3. Create a Signature:
– In the “General” tab, scroll down to the “Signature” section.
– Click on “Create new” and enter a name for your signature.
– Enter your desired signature in the text box. You can use the formatting options to add images, links, and styled text.
– Assign your signature to new emails and/or replies and forwards.
– Scroll down and click “Save Changes”
3. Creating an Email Signature in Outlook Webmail
1. Log in to Outlook Webmail:
– Go to [Outlook Webmail](https://outlook.live.com/) and log in with your Microsoft account.
2. Navigate to Settings:
– Click on the gear icon in the top right corner and select “View all Outlook settings”.
3. Create a Signature:
– In the “Mail” tab, select “Compose and reply”.
– In the “Email signature” section, enter your desired signature.
– Use the formatting options to customize your signature.
– Choose whether to automatically include your signature on new messages and replies/forwards.
– Click “Save”.
Tips for Creating an Effective Email Signature
– Keep It Simple: Include essential information such as your name, position, company, phone number, and email address.
– Brand Consistency: Use your company’s colors, fonts, and logo to maintain brand consistency.
– Professional Appearance: Avoid using too many colors, fonts, or images. Keep the design clean and professional.
– Include Links: Add links to your website, social media profiles, or professional profiles like LinkedIn.
– Legal Disclaimers: If necessary, include any legal disclaimers or confidentiality notices.
Creating an email signature in webmail is a simple process that enhances your email communication’s professionalism and provides recipients with your contact information. Whether you use cPanel Webmail, Gmail, or Outlook Webmail, following the steps outlined in this guide will help you create an effective and visually appealing email signature.
The video explain detail about it.
